When film was the primary medium people used to make photos, you didn't get to see your photos until they were printed. If you didn't do your own darkroom processing, you relied on the photo lab to develop the negatives and make the prints for you.
Now, dSLR photographers can see a small version of their photo right on the camera, but if they want those photos to display nicely on a computer monitor, somewhere online, on some other digital device or have it printed, there are choices about camera settings that need to be made. Those choices can have a big impact on how sweet your photos look and how much editing you can do to them and still have them look nice.
Each camera has many settings, and most are covered in each camera's users manual, but 2 of the more important, somewhat esoteric settings, are worth taking a closer look at.
Color Space
Most digital SLR's give you 2 choices of color space:
- sRGB
- AdobeRGB
sRGB
The color space of choice for the online world is sRGB. But, sRGB doesn't include all the colors that we can see in real life but it includes all the colors that can be reproduced in a photographic print, online, or on a computer monitor.
For someone wanting to edit images, but that has as yet not under taken a study of digital color management, choosing sRGB is a good move.
If you would like more information on sRGB visit: Wikipedia - sRGB
AdobeRGB
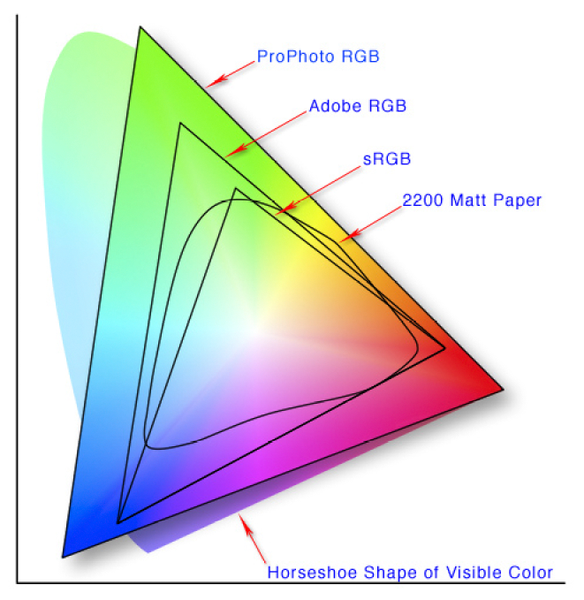
AdobeRGB has a somewhat wider color gamut than does sRGB. As can be seen in the accompanying image the AdobeRGB gamut includes mainly more green tones than does sRGB.
AdobeRGB can be advantageous to you once you have acquired some knowledge of color management, are making an image destined for use in a commercial printing application, or you know of editing advantages you can take advantage of from using it.
If you would like to explore more info about AdobeRGB visit: Wikipedia - AdobeRGB
NOTE: One of the other color spaces shown in the above image is ProPhoto RGB which is the default color space used in Adobe Lightroom. Notice that ProPhoto RGB includes more reds, and some of the blue tones in the ProPhoto RGB gamut are beyond what the human eye can even see.
If you would like to explore more info about ProPhoto RGB visit: Wikipedia - ProPhoto RGB
Image Data Format
Digital SLR's offer a range of image data format choices. How wide that range is depends on where in the model lineup your dSLR is.
Entry-Level dSLR's typically offer just 2 choices:
- JPEG
- RAW
RAW
RAW is not an acronym. RAW image data formats are proprietary information exclusive to each camera maker. Here is a partial list of camera maker's proprietary RAW formats, as there are over 100 of them:
- Nikon - .nef, .nrw
- Canon - .crw, .cr2
- Pentax - .ptx, .ptf, .pef
- Olympus - .orf
- Fuji - .raf
- Sigma - .x3f
RAW data files provide the most image data the camera can provide and are akin to a film negative.
Consequently, the image files are usually as large as your camera can produce and take up the maximum amount of memory card space.
They also give you the most options for image editing, because they contain so much image data.
Digital SLR cameras have menu settings for things like contrast, saturation, sharpening, color space, and white balance.
None of those settings get applied to a RAW file.
All RAW files need to be edited to one degree or another after they have been converted.
Raw files cannot be converted unless you have downloaded the conversion application that is specific for your camera model. In other words, if you had been shooting RAW captures with a Nikon D200 and have recently upgraded to shooting with a Nikon D300, you will need the conversion update that includes the code for the D300. The D200 conversion code is different and won't work for converting D300 RAW images.
On a side note: The photo (and histogram) displayed on the camera LCD is not the RAW capture but a temporary conversion so you can at least evaluate focus and/or framing/composition. As mentioned above a RAW image is not directly viewable.
If you would like to learn more about the Raw image format visit: Wikipedia - Raw image format
JPEG
Joint Photographic Experts Group is what JPEG stands for.
JPEG is a 'ready to print' image format and as such are akin to a photographic print made from a film negative.
The settings mentioned above in the RAW section: contrast, saturation, sharpening, color space, and white balance do get applied to JPEG files. Even if those in-camera settings are left set to normal, contrast, saturation and sharpening edits are applied by the camera before it shows you the photo on the back LCD.
JPEG is a compressed, lossy image format. The files are compressed to make them smaller so more files can be stored on your memory card.
The main way JPEG compresses the file size to make them smaller, is by discarding up to 80% of the color data the original Raw image data contained.
Because of the way the human eye works, the color data is least important and can be discarded with little notice.
However, loss of that color data, and some other steps JPEG takes, puts some serious crimps on what can be done during editing.
If you would like to learn more about the JPEG image format visit: Wikipedia - JPEG
